 |
Building an Israeli M3 Halftrack 1/35th Scale Tamiya Kit No. 35070 |
|
|
Building an Israeli M3 Halftrack 1/35th Scale Tamiya Kit No. 35070 |
|
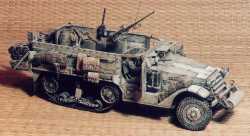
| The Tamiya M3 Halftrack is quite a good kit, despite it's age, and is the starting point for this conversion. The only major modification to the kit is the addition of the machine gun hatch in the passengers half of the windscreen. |

Click for larger view |
|
Starting with the chassis, this was built up as per the instructions and only
required minor detail additions. As the body work could be added later, the completed
chassis was painted at this stage. Starting with a base coat of matt Black the chassis
was then drybrushed with ever lighter shades of Browns and Khakis to give a dirty,
dusty appearance to the chassis. The front bodywork came next with the addition of the scratchbuilt machine gun housing. This was built from plasticard with a hinged top plate and the 30 cal machine gun received a curved profile, circular shield with a bump stop added to it's lower edge. The spent cartridge belt was added from a strip of paper. The kit windscreen was then cut down to fit and glued in the raised position. The driver's door had the window cut off of the top and this was then glued in the open position, as was the door itself. The handle to close the window was added from plasticrod. One of the Jerrycans was then modified to represent the Israeli Plastic Jerrycans and this and the unmodifed jerycan, were added to the sides of the engine bay. Two hoops were added to the front corners of the drivers compartment from plasticrod (these acted as bump stops for the 50 cal in the rear). Some general stowage and personal weapons were placed around the inside of the front compartment to give a "lived-in" look to this area of the vehicle. |
Click for larger view |
| The rear compartment was constructed next and followed the kit instructions fairly closely. A 50cal and it's pedestal were added to the front floor of the rear compartment. Scratchbuilt 30cal machine gun mounts were added to the two side mounting points. The ladders that came moulded to the hull sides were very carefully removed so as not to destroy the surrounding rivet detail. Stowage bars were added in their place and various items of stowage were tied and draped over these bars and in the mine racks below. The rear stowage racks were built as per the kit instructions and the rear door was glued in the open position. Moving back inside, various items of personal equipment and stowage were added to the floor and stored behind the seats. An infanrtry radio was added behind the front passengers seat and the handset, with its coiled wire, was draped over the back of this seat. |

Click for larger view |
|
Having now completed all of the construction, it was time to paint the two sub
assemblies of the bodywork. I hand painted a solid coat of Tamiya Panzer Grey
to serve as both an undercoat and a shadow colour. The sub assemblies were then
given a broken coat of Blue Grey leaving the Panzer Grey showing around all those
rivets and all the detail. Next, an even more broken coat of khaki was painted on,
leaving both previous coats visible around all the details. Finally came a coat of
JN Grey and this was painted in a cloudy pattern on the flatter areas of the model. Having glued all the sub assemblies together and allowed everything to dry for a couple of days, I started on the dry brushing using Sandy colours to impart a dusty appearance to everything. All the stowage and detail painting had been done previously and the final drybrushing coats of paint also tied all the individual elements together and gave everything a uniform appearance. The markings were a mixture of dry transfers (from Verlinden) and hand painted. |
| [ Home | | Vehicle Modelling | | Aircraft Modelling | | Vehicle Reference | | Aircraft Reference ] |
| [ Reviews | | Forum | | Books | | Articles | | What's New | | Links ] |
|
|
||
| Copyright ©2000-2005 IDF Modelling | ||