 |
Building an Israeli M60 A3 Dozer 1/35th Scale Academy Kit No. 1358 |
|
|
Building an Israeli M60 A3 Dozer 1/35th Scale Academy Kit No. 1358 |
|
| HISTORY AND DEVELOPMENT |
|
The M60 A1 The M60 A1 Patton is the result of the continuing development of the concept of the main battle tank from the M26 Pershing to the M46/M47/ and 48. The M60 was built to fight against the Russian tank T54 in the mid 1950's. Although resembling the M48, it has however a greater fire power thanks to it's 105mm cannon, and has a greater autonomy thanks to it's diesel motor. In addition, its turret has been completely reshaped, giving it a more pointed profile. The shape of the hull has also been modified, and has more armour on the front part. For decades this tank spearheaded American tank units and it is still in service today. It is constantly updated thanks to successive modernisations to its design and equipment. In spite of all these improvements, the principal fault with the M60 is that it is quite high up on its wheels and it is outclassed by modern productions. |
|
The A3 Version The current model is the M60 A3. The M60 A3 has benefited from the following improvements made to the M60 A1. The installation of a laser rangefinder developed by Hughes Aircraft, a new night-vision device, a vertical and horizontal stabilization for the main gun, a new engine Rise AVDS 1790-2A, a new pair of tracks, a new searchlight and a new thermal sleeve on the gun barrel, a new coaxial 7.92 mm machine gun and 6 smoke candles on each side of the turret. All these improvements have been retrofitted to the M60A1, thus becoming M60A3. Its ammunition capacity comprises of 63 shells of 105mm, 26 of these stored in the inferior part of the hull, 13 stored in turret ready to be used, and another 3 under the gun breech. In a similar way, trials have been carried out to fit a new 120mm gun, but it remains to be confirmed if these weapons will be fitted to the M60 fleet. A 12.7mm machine gun is installed under the tank commander cupola. The M60A1 and A3 can be equipped with a dozer blade, fixed under the front hull. Also a NBC system can be added, as well as a kit allowing the tank to cross-rivers. Production of the M60 ended in 1984, and more than 13 000 machines have been assembled for the home market as well as exportation. Apart from the United States and Israel, the M60 has been delivered to: Austria, Italy, Egypt, Iran, Jordan, Morocco, Saudi Arabia, Sudan, Tunisia and North Yemen. |
|
Variants Two principle other versions of the M60 have been produced. The M60AVLB and the M728 CEV. The M60AVLB is a bridge carrier, equipped with a foldable bridge able to cross 18 metre wide rivers. The combat engineer vehicle is fitted with the same turret and same hull as for the M60a1. But it is fitted with a 165 mm demolition howitzer, able to release HESH (Highly Explosive) ammunitions, destined to destroy fortifications and armoured shelters. A dozer blade fitted at the rear of the vehicle, is used to clear the battlefield, and to prepare positions for other tanks. This blade is A shaped; it can be laid and lowered when not used. |
| THE KIT |
| Construction |
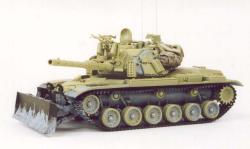
| Here is the M60 A3 from Academy. This is the Israeli version, and it is worth mentioning that Academy is one of the most prolific manufacturers concerning the Israeli army. The kit is referenced No. 1358, and the dozer blade we can see here is not provided in the box. This item was taken from the box of the M60 A1 RISE DOZER, which is the American version of the Blazer. It adapts to the kit with no modifications. |

Click for larger view |
| The kit is moulded in the now usual academy standard, which is very good, if you cross check with references. Basically, there is nothing to add, and as previously mentioned, only the dozer blade was fitted. It was separately built and left aside. The building stages were followed without problems. Just to mention, when reaching the wheels and torsion bars assembly stage, be careful when installing the components. I would advise you to glue every thing if you don't want to have problems later. The tracks are a bit too short, so if it shrinks, you might end up with misaligned torsion bars and wheels, or it could even break when you'll install them. At the end, I noticed that the model was a bit too high, so I modified the position of these bars in order to get them back to the correct appearance. |
Click for larger view |
| The overall bottom hull received a light coat of mud, made from Tamiya putty, thinned with acetone. As for the blade, you just need to make a heavier mix, just modify the percentage of acetone and use an old stiff brush. The various back bags and rucksacks on the sides were saved from an old model, which unfortunately finished its life in the bin. |
Click for larger view |
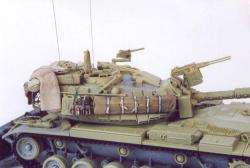
| Israeli vehicles on campaign are frequently covered with bags and all sorts of crew gear. The reason for this is that the Israeli troops are outside their bases for long periods of time, so they store the maximum effects on the outside of the tank, inside being reserved for combat duties. The canvases visible are made from rolled milliput, which is ideal for this kind of work. The technique to obtain this is really easy, even for beginners. Just get the usual putty, you mix the two parts together, and using your wife's baking tray and a bit of flour (only when she's out for shopping, or you're dead!!) you roll the putty until you obtain a very thin layer. It is then cut to size, rolled or installed on the tank to get the correct shape and left aside to dry. When completely cured, these items will be strongly attached to the model, as they are in reality. |

Click for larger view |
| Here is a close up on these bags. Be careful to respect logical and practical aspects. You can't store anything just anywhere, as often seen on models. It is this kind of mistake that is commonly seen in shows. The best way possible to avoid mistakes like these is to check in your books again and again. |

Click for larger view |
| A very light application of putty and acetone has been applied on the turret and the front glacis plate. This time not to match the mud, but to reproduce the roughcast effect of the tank. The wheels received the same treatment, a lot heavier this time, in order to imitate mud and dust. (Very common in these countries). |
| Painting |
| After long hours of preparation and painting, here is what you can obtain with the academy M60. The dozer blade allows a bit of wear and tear. Here we go, in eight stages, I will explain how to get there. |

Click for larger view |
| As for information, the paints used for this kit were exclusively taken in the Humbrol range. As this range of paints is available anywhere in the world, you won't have any difficulty getting them. |

Click for larger view |
| Firstly, the model is painted with an overall coat of Khaki green. Note that any sort of green will do, whether its light green, olive green, or even dark green. This is because the new official paint scheme of the Israeli armoured vehicles is dark khaki green. With the amount of weathering you will add to your kit, the base coat is of no interest, really. When I said paint the overall vehicle, I meant I painted it completely including the blade, the accessories, and the running gear. |

Click for larger view |
| When the base coat had dried completely, I sprayed several thin coats of sand colour on each flat surface of the model. If you use an airbrush make sure not to spray continuously, but instead press slightly on the trigger to only release small amounts of paint. You must not cover the model, but just apply a veil. You can also do this work on the running gear, but only in the centre of the wheels. The wheel rubber shoes and the return rollers were painted black as seen on the picture. |

Click for larger view |
| The last stage of the painting stage deals with the orange colour. As you may know, there are lots of areas in Israel where you can find an orange coloured soil. This particular colour is common to some places in Vietnam. This colour was sprayed on the running gear, under the front and rear mudguards, and mainly under the dozer as shown on the picture. This item and tracks are the two main components that are in permanent contact with the ground. But it has to remain a mist. If you apply too heavy a coat, you will lose the effect and the paintwork will be hideous. Of course this technique is possible if you don't possess an airbrush. The inside details of the smoke candles are painted black, in order to allow a better effect when dry brushing. |

Click for larger view |
| The model had been left to cure. Now is time to paint the accessories. I won't use the airbrush anymore except for the tracks. It is time for a good cleaning session. The sleeping bags on the turret are painted with dark olive green and the machine gun received a first coat of black. |

Click for larger view |
| The next stage is the weathering. For this I used a 000 fine pointed brush and olive green paint. I started to work on each box separately, and when finished I went onto the hull. Each edge of the tank has been worked out. I also used an old brillo pad. I dipped it into the paint and worked the hull and turret with it. It reproduces the various paint scratches one can find on an operational machine. Work slowly and be gentle. If you are not sure about what to do, carry out some trials on a bit of plasticard. The rust streaks have to be rare, those visible were hand painted using burnt sienna oil paint. This was used straight from the tube. Some thinned paint was allowed to flow in the nook and crannies of the kit. Work on small areas, and be careful not to overdo this process. Israeli tanks are not rolling dustbins. In the same way, painting of the details will be achieved. |

Click for larger view |
| The straps on the bags are painted with off white, heavily dusted with dark paint washes. Markings were applied at this stage. These were hand painted as for the V-signs, and symbols on the jerrycans. The licence plates are from a Verlinden transfer sheet. Of course these markings were dusted and weathered. Don't forget to do this, as we often see nice models with very realistic weathering but wearing brand new and clean plates! Don't laugh but take a close look at the next hobby show. The protective canvas on the gun barrel is painted with Humbrol paint reference 29 and slightly brushed with sand colour and white. The gun barrel is not forgotten, and also heavily weathered. The machine guns are brushed with some silver rub'n'buff. The tank commander inner hatch is also painted off white and weathered with dark washes. |

Click for larger view |
| As one can see, the engine deck is as dirty as the rest of the vehicle. It is even dirtier than the rest. The orange flag is characteristic of the Israeli army. It is made following the same process as explained before. (Rolled putty). As for the flag on the mast, it is slightly different and new. It was when I visited a web site dedicated to the Israeli army, that I discovered a picture showing a column of M60 and M113 sporting these orange and black flags. Are they used for reconnaissance during exercises? Or maybe these have a function in the regimental organization? If one of the readers could give me some information, I would greatly appreciate it. Maybe Mr Norris? This flag is made from double sided tape, hand painted. The Verlinden ration boxes are perfect for this model, and I must admit that the flag and these boxes add a lot to it. |
| The machine gun handles are first painted in yellow then a light wash of burnt sienna oil paint is spread on top of it. Leave it for a few minutes and brush with a clean brush. You will obtain a nice wooden effect. The various jerrycans on the model are not all painted in the same way. Some are black, some are green. It is up to the modeller's choice. The ammunition belt at the front is painted with artist gold powder. Every five bullets, there is a red one. The antennas are made from 0.2mm piano strings, held by a real hair, taken from my daughter's head, because I needed long ones. The little white balls on these, are used to localise the string, which is not always obvious in difficult conditions. These balls are made from white glue. Tracks are installed when the model is finished. They were primarily painted with dark brown and brushed with rub' n' buff. The model was finalised with a last mist of orange colour in order to get a homogenous colour. Now, dear readers and modellers, get your brushes ready and go !! |
| [ Home | | Vehicle Modelling | | Aircraft Modelling | | Vehicle Reference | | Aircraft Reference ] |
| [ Reviews | | Forum | | Books | | Articles | | What's New | | Links ] |
|
|
||
| Copyright ©2000-2005 IDF Modelling | ||